Enregistrement de voix off live sur la timeline : compte à rebours, pre-roll, nouveau bouton, meilleure visualisation du process
Une séquence peut se créer en glissant des médias sur une timeline vide
La commande Ripple Delete peut s’utiliser avec des points E/S dans la timeline
Media Browser : on peut ouvrir plusieurs panneaux à la fois, pour rechercher des médias en plusieurs endroits
La sélection d’élément (clip selection) est prioritaire sur la piste cible, pour de nombreuses fonctions de montage (match frame, marquer élément,…)
Une caméra multicam unique montre uniquement cette caméra dans les fenêtres sources et programme.
Le nom de l’élément source est indiqué sur un élément multicam d’une séquence
Support Dolby E avec Mercury Transmit
AVC intra : on peut rendre des fichiers AVCi100.mov en MXF AVCI100
OpenCL : les performances OpenCL ont été améliorées
Avec une ou plusieurs séquences sélectionnées dans le panneau Projet, on peut créer un nouveau projet à partir de ces séquences
Marqueurs dans un élément ou une séquence : exportables dans un document, comme .csv ou .html, avec icônes
Medias XAVC 60p 4k : performances améliorées avec matériel Matrox
Formats OP1a utilisables pour des rendus de preview
Support AVC-ultra amélioré
Export OMF amélioré, surtout avec des pistes audio adaptives
Toute la mise à jour, expliquée en détails par Adobe : Editing Finesse enhancement
Descriptive text in empty Project panel or Timeline panel
When the Project panel is empty, Premiere Pro shows descriptive text that says « Import Media To Start ».
When the Timeline panel is empty, Premiere Pro displays the text « Drop Media Here To Create Sequence ».
When you drag-and-drop any files to the Project panel or Timeline panel, or import files into the Project panel, the text disappears.
When you specify auto-save to occur at regular intervals, Premiere Pro auto-saves a project on detecting changes to the project file.
The auto-save occurs irrespective of whether you manually save the changes to the project or not. Earlier, Premiere Pro would not execute auto-save if you manually saved within the interval setting.
If the system goes idle for a period beyond the interval setting, Premiere Pro forces an auto-save.
You can quickly create a sequence by dragging media and dropping it to the empty Timelinewindow. Premiere pro creates a new sequence from the media file that you dragged to theTimeline.
Premiere Pro lets you export markers from a single media asset or sequence to a CSV or HTML file. The Export Markers feature works with the asset whose markers are loaded in the Markers panel.
- Load the markers of the required clip or sequence into the Markers panel. To do so, select the clip or sequence in the Project panel, or set focus on the Source Monitor, Program Monitor, or Timeline.
- Select File > Export > Markers.
- In the Export Markers dialog, specify the file type, output destination, and filename. Then, click OK.
The markers are exported as a list to a comma-separated CSV file or a web page in HTML file format.
Premiere Pro now displays duplicate frame markers for media created from the same file, or from files with identical timecode and tape name metadata.
Premiere Pro displays duplicate frame markers in the Timeline when track items are duplicated in the following scenarios:
- The same master clip is used
- The master clips are created from projects that use the same media on disk
- The master clips are created from media with matching tape name and timecode metadata, where the tape name is not blank and timecode is not 00:00:00:00
You no longer use multiple keyboard shortcuts to set a clip marker on a selected clip. You simply select the clip in the Timeline and press the M keyboard shortcut. A clip marker is applied to the selected clip.
When you select a clip, a gap, or an In/Out range, and use the Ripple-Delete command, the selected clip, gap, or In/Out range is ripple-deleted.
When using the Ripple-Delete command, the priority of selection is as follows:
- Clip
- Gap
- In/Out range
That is, when using the Ripple-Delete command, a clip or gap selection has priority over selecting an In/Out range selection. The keyboard shortcut for the Ripple-Delete command is Shift+Delete (Win) or Shift+Forward Delete (Mac).
When you work on Premiere Pro projects stored on a network drive, a warning dialog protects you from overwriting someone else’s changes.
Say, you open a project from a network drive and make changes, and a second person opens the same project and makes changes. Then, a warning appears when trying to save the project.
In the warning dialog, click OK to overwrite changes to the project on the network, or clickCancel to save a copy of the project.
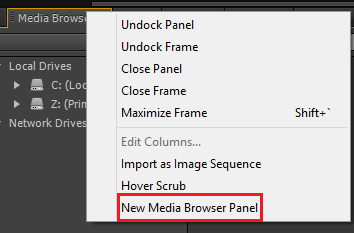
To easily access multiple projects and media locations, Premiere Pro lets you open multipleMedia Browser panels simultaneously.
Select New Media Browser Panel from the Media Browser’s context menu.
Premiere Pro automatically finds and links offline media where possible. However, there are times, when you want to quickly open a project without automatically relinking the offline media. Premiere Pro now lets you do that by providing a Cancel button in the Progress dialog. When you click Cancel, Premiere Pro bypasses the automatic relinking workflow, and opens theLink And Locate dialog only if it detects offline clips.
You can now create a Premiere Pro project from a selected clip sequence.
- Select the clip sequence in the Project panel.
- Select File > Export > Selection As Premiere Project.
- Select a project name and location, and click Save.
Premiere Pro creates the project (.prproj filename extension) in the specified directory.
Note:
When Premiere Pro creates the new project, the required project files are copied to the specified directory without moving the source files. Any media not associated with the sequence is excluded from the new project.
Single source multi-camera sequence shows full-frame clip
When there is only a single video stream in a multi-camera source sequence, the Sourcemonitor displays that video clip as a full-frame clip. Earlier, the clip would be displayed in a quarter frame; that is, a single angle displayed in the multi-camera 2 x 2 grid.
Show multi-camera clip names in Timeline
The multi-camera source sequence clips in the Timeline display the source clip names. This feature helps you quickly determine which camera angle is switched to the output.
The source clip names are appended to the multi-camera source sequence name. For example, [MC1] Camera 1.mov, [MC2] Camera 2.mov.
Sequence Preset option for switch audio
Earlier, sequence presets could be used only in Custom Sequence settings. That restriction is now removed. You can now select a custom or a previously saved sequence preset for camera 1, all cameras, or switch audio.
Premiere Pro now lets you set up and record voiceovers on audio tracks directly from theTimeline, without using the Audio Track Mixer workflow.
Display the Voice-over Record button
The voice-over Record button ![]() lets you record a voice-over directly from the Timeline on to an audio track. To display the voice-over Record button in the Timeline header, do the following:
lets you record a voice-over directly from the Timeline on to an audio track. To display the voice-over Record button in the Timeline header, do the following:
- Select the track in the Timeline to which you want to add the voice-over
- Click the Settings button in the Timeline and select Customize Audio Header.
- From the Button Editor dialog that appears, drag-and-drop the Microphone button
 to the required audio track, and click OK.
Start the voice-over recording workflow
Start a voice-over recording workflow by doing one of the following:
- Mark a specific In/Out range to insert the audio recording, or
- Position the playhead at the starting point of inserting the voice-over
Display pre-roll countdown
As soon as you mark the In/Out range or position the playhead, the voice-over recording workflow starts. A pre-roll countdown appears as an overlay on the Program Monitor.
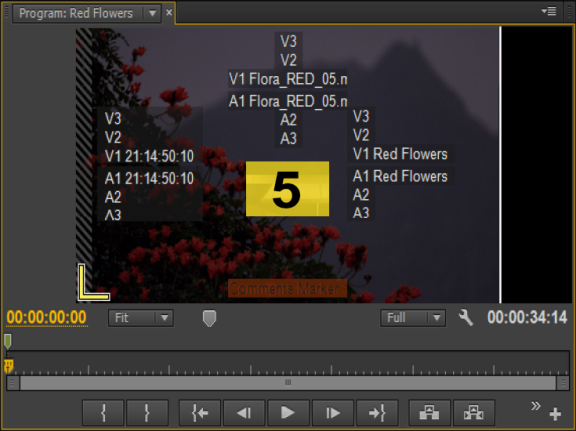
Pre-roll countdown displayed as an overlay on the Program Monitor
The pre-roll countdown is a visual cue to give you time to prepare and begin the recording. Recording begins after the countdown reaches zero. You can specify the duration of the pre-roll countdown in the Preferences dialog.
Begin recording
Click ![]() in the audio track’s header to begin recording. A status message « Recording… » appears in the Program Monitor to indicate that recording is on.
in the audio track’s header to begin recording. A status message « Recording… » appears in the Program Monitor to indicate that recording is on.
When using a predefined In/Out range, you don’t have to click the Voice-over Record button ![]() . Recording automatically starts when the playhead reaches the In point in the Timeline.
. Recording automatically starts when the playhead reaches the In point in the Timeline.
Finish Recording
When using a predefined In/Out range, recording ends when the playhead reaches the Out point in the Timeline. The status message on the Program Monitor then changes to « Finishing… ». If you are not using a predefined In/Out range, stop the recording manually by clicking the Voice-over Record button ![]() again, or by pressing the Spacebar key.
again, or by pressing the Spacebar key.
Once recording is complete, an audio file of the recording is created. The audio file is imported as a new project item into the Project panel.
This release of Premiere Pro CC further leverages the power of third-party GPUs to increase speed of work with high-resolution formats:
- OpenCL performance is faster and more stable than before
- Performance improvements for UltraHD
Premiere Pro now supports the following NVIDIA graphics cards:
Windows
- Quadro K1100
- GeForce GTX Titan
Mac
- GeForce GT 750M
For the complete list of supported graphics cards, see the Tech Specs.
- Premiere Pro now uses the MXF Importer for importing P2 and Canon XF files
- You can natively import AVCI-100 .mov files and smart render the files to MXF-wrapped AVCI-100 files
- When using third-party transmit tools for SDI display, Premiere Pro ensures that the audio and video are in sync at all times
- Improved playback performance for Sony XAVC 60p media


